Font Awesome arrows
inside CSS accordion
Inside this tutorial I will show you how to add Font Awesome arrows inside a CSS accordion.
This tutorial will be the continuation from my last blog where I showed you how to create a pure CSS accordion without JavaScript.
So please make sure you read that first by just visiting this link before you even take this one.
Also don't forget to check this pure CSS accordion collection to get more inspiration.
Don't waste your time
And as I always recommend, please check the demo below
So you can make sure this is what you want and need.
DEMO: Font Awesome arrows CSS accordion.
If this is what you want, then please proceed.
The original accordion
Below you will find the full HTML from our original accordion.
To make things easy, we are going to keep building on top of this code.
<!doctype html>

<html>

<head>
<meta charset="utf-8">
<title>CSS Accordion</title>

<style>

input {
    display: none;
}

label {
    display: block;
    padding: 8px 22px;
    margin: 0 0 1px 0;
    cursor: pointer;
    background: #6AAB95;
    border-radius: 3px;
    color: #FFF;
    transition: ease .5s;
}

label:hover {
    background: #4E8774;
}

.content {
    background: #E2E5F6;
    padding: 10px 25px;
    border: 1px solid #A7A7A7;

    margin: 0 0 1px 0;
    border-radius: 3px;
}

input + label + .content {
    display: none;
}

input:checked + label + .content {
    display: block;
}

</style>

</head>

<body>

<input type="checkbox" id="title1" />
<label for="title1">Accordion One</label>

<div class="content">
<p>Your content goes here.</p>
</div>

<input type="checkbox" id="title2" />
<label for="title2">Accordion Two</label>

<div class="content">
<p>Your content goes here.</p>
</div>

<input type="checkbox" id="title3" />
<label for="title3">Accordion Three</label>

<div class="content">
<p>Your content goes here.</p>
</div>

</body>

</html>
Sample #1
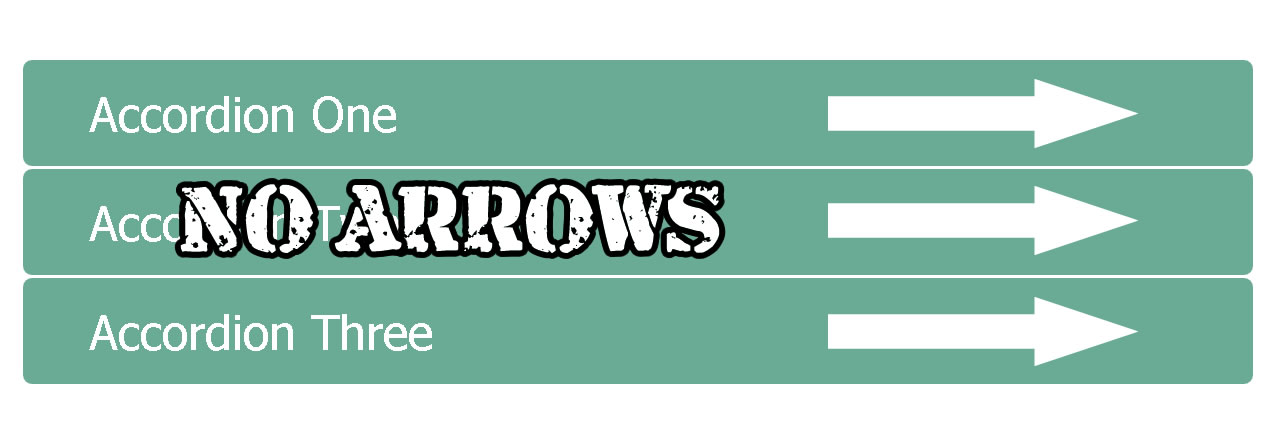
If you check this HTML markup, you will notice that there are no arrows inside the label tags.
You can see the image below or check the demo here.
Adding the Font Awesome CSS Style
To start adding these arrows, we first need to add the CSS styles from Font Awesome.
You can find the code inside this link.
You will find something like the code below.
<link rel="stylesheet" href="https://use.fontawesome.com/releases/v5.8.2/css/all.css" integrity="sha384-oS3vJWv+0UjzBfQzYUhtDYW+Pj2yciDJxpsK1OYPAYjqT085Qq/1cq5FLXAZQ7Ay" crossorigin="anonymous">
Sample #2
Make sure you still visit the Font Awesome page so you can actually get the latest code.
Where to add this Font Awesome code?
You will be adding this code just before the ending "head" tag.
Just exactly like below.
<link rel="stylesheet" href="https://use.fontawesome.com/releases/v5.8.2/css/all.css" integrity="sha384-oS3vJWv+0UjzBfQzYUhtDYW+Pj2yciDJxpsK1OYPAYjqT085Qq/1cq5FLXAZQ7Ay" crossorigin="anonymous">

</head>
Sample #3
Adding the accordion arrows
Your next step is finding the arrows inside the Font Awesome website.
Remember because we already installed the Font Awesome CSS styles, you can actually use any icon you want from their site.
But in this case, the arrows are the icons we want.
To find these arrows please visit this link.
And then type "chevron" inside the search bar.
You will find the chevron up and the chevron down.
Just get the Unicode
Now please don't copy the HTML code.
What you want to get is only the Unicode
See image below
In this case the Unicode for "chevron up" is "f077" and the Unicode for "chevron down" is "f078".
Adding arrows with CSS
Our next step is to add these arrows inside the accordion.
And to be more exact, add the arrows after the accordion label names.
To accomplish this, we will be using the CSS pseudo element "::after".
Remember, we have this initial HTML code.
<input type="checkbox" id="title3" />
<label for="title3">Accordion Three</label>

<div class="content">
<p>Your content goes here.</p>
</div>
Sample #4
Adding the Chevrons up and down
We are going to add the following CSS styles to target the labels and add the arrows after the name.
In this case we need to add the family font name to call the Font Awesome styles and then add the Unicode we copied inside the content property.
NOTE: You need to also add the "font-weight" property and specify the boldness to make the icon work, in this case we will only use "900" or "bold" if you want.
See below.
label::after {
	font-family: "Font Awesome 5 Free";
	content: '\f078';
	font-weight: bold;
}
Sample #5
Next let's add the "chevron down" so when the user clicks on the label the arrow changes.
See the new CSS styles when the label is checked or clicked in this case.
input:checked + label::after {
	content: '\f077';
}
Sample #6
The final CSS styles
To finish this tutorial, we will just add a couple more CSS properties to move the arrows around.
See below.
label::after {
	font-family: "Font Awesome 5 Free";
	content: '\f078';
	font-weight: bold;
	font-size: 22px;
	position: absolute;
	right: 10px;
	top: 6px;
}
Sample #7
What this final CSS will do is to move the arrows all the way to the right.
This will be accomplished with the position, the top, and the right properties.
Now please keep in mind that the moment we add the "position: absolute" to the "label::after", we will need to add the "position: relative" to the main label.
Like below.
label {
	position: relative;
}
Sample #8
This will help the arrows to stay in place inside each label and don't overlap outside their own labels.
And that's it we finished.
If you want to download this code, please visit the link below.
LINK:Download
Or if you want to just copy the full code see below.
Full HTML code.
<!doctype html>

<html>

<head>
<meta charset="utf-8">
<title>CSS Accordion</title>

<style>

input {
    display: none;
}

label {
    display: block;
    padding: 8px 22px;
    margin: 0 0 1px 0;
    cursor: pointer;
    background: #6AAB95;
    border-radius: 3px;
    color: #FFF;
    transition: ease .5s;
	position: relative;
}

label:hover {
    background: #4E8774;
}

label::after {
	font-family: "Font Awesome 5 Free";
	content: '\f078';
	font-weight: bold;
	font-size: 22px;
	position: absolute;
	right: 10px;
	top: 6px;
}

input:checked + label::after {
	content: '\f077';
}

.content {
    background: #E2E5F6;
    padding: 10px 25px;
    border: 1px solid #A7A7A7;

    margin: 0 0 1px 0;
    border-radius: 3px;
}

input + label + .content {
    display: none;
}

input:checked + label + .content {
    display: block;
}

</style>

</head>

<body>

<input type="checkbox" id="title1" />
<label for="title1">Accordion One</label>

<div class="content">
<p>Your content goes here.</p>
</div>

<input type="checkbox" id="title2" />
<label for="title2">Accordion Two</label>

<div class="content">
<p>Your content goes here.</p>
</div>

<input type="checkbox" id="title3" />
<label for="title3">Accordion Three</label>

<div class="content">
<p>Your content goes here.</p>
</div>

</body>

</html>
Sample #9
As you can see, learning all this it is not easy as you can think.
But it is necessary if you want to become a good web developer.
For the mean time that is all for me.
If you have any questions please don't hesitate to click the green button.
Get Inspired, see these 18 pure CSS accordions
Lorem ipsum dolor sit amet, consectetur adipiscing elit. Etiam bibendum, sem eu pulvinar blandit, et luctus tellus magna sed nibh.
Lorem ipsum dolor sit amet, consectetur adipiscing elit. Etiam bibendum, sem eu pulvinar blandit, et luctus tellus magna sed nibh.